There’s something irresistibly beautiful about the simple elegance of a homemade bark studded with bright fruit and rich chocolate. This Chocolate Raspberries Bark Recipe is not only stunning but also a delightful balance of tart and sweet — perfect for sharing or indulging solo.

Jump to:
Why You'll Love This Recipe
I remember making this Chocolate Raspberries Bark Recipe on a whim one lazy afternoon and being amazed at how impressive it looked without any fuss. It’s a fantastic crowd-pleaser, and the fresh tartness of raspberries complements the creamy chocolate layers superbly.
- Simple No-Bake Delight: You don’t need an oven or special equipment to create this treat.
- Stunning & Colorful: The vibrant red raspberries against the chocolate make it look as good as it tastes.
- Perfect Balance: Tart frozen raspberries with smooth white and dark chocolate layers keep every bite interesting.
- Customizable: Easy to tweak by adding nuts, seeds, or different berries for your spin.
Ingredients & Why They Work
The magic of this Chocolate Raspberries Bark Recipe lies in its simple ingredients that harmonize perfectly. Using frozen raspberries keeps the fruit fresh and slightly tangy, while the white and dark chocolates offer contrasting flavors and textures.

- Frozen Raspberries: Using frozen instead of fresh helps the raspberries stay firm and juicy, adding a nice texture against the creamy chocolate layers.
- White Chocolate: This adds a sweet, creamy layer that tones down the tartness of the raspberries beautifully.
- Dark Chocolate: The slightly bitter dark chocolate balances the sweetness and adds depth to the bark.
- Extra Raspberries (for decoration): Adding fresh or frozen raspberries on top gives a vibrant, natural look and a refreshing burst of flavor.
Make It Your Way
One of my favorite things about this Chocolate Raspberries Bark Recipe is how easy it is to adapt. I often mix up the berries or sprinkle a few chopped nuts on top for an added crunch.
- Variation: Once, I swapped frozen blackberries for raspberries, giving it a more intense fruit flavor that paired wonderfully with the bittersweet chocolate.
- Dietary Tip: For a vegan twist, opt for dairy-free chocolates to keep it both delicious and allergy-friendly.
- Seasonal Change: In summer, try fresh raspberries instead — just keep in mind the moisture content might alter the bark’s crispness.
Step-by-Step: How I Make Chocolate Raspberries Bark Recipe

Step 1: Lay Out Your Frozen Raspberries
Start by arranging frozen raspberries in a neat rectangular shape on a baking tray lined with parchment paper. This will create the tasty fruity center of your bark, so don’t be afraid to spread them evenly for nice coverage. Using frozen berries is key here—they stay firm and won’t make your chocolate soggy.
Step 2: Melt and Spread the White Chocolate
Gently melt your white chocolate — I recommend doing this in short bursts in the microwave or over a double boiler to avoid burning. Once silky smooth, pour it carefully over the raspberries, spreading it evenly with a spatula. Pop the tray in the freezer for 5 to 10 minutes until the chocolate layers firm up just enough to hold the next layer without mixing.
Step 3: Add the Dark Chocolate Layer
Next, melt the dark chocolate using the same careful method. Spread this warm layer over the white chocolate-covered raspberries. The contrast in color and flavor here is what makes the bark such a treat. Don’t worry if you see a little mixing at the edges—that’s part of the charm!
Step 4: Decorate and Freeze
Add a handful of extra raspberries on top immediately after spreading the dark chocolate. This spruces up the bark and boosts the berry flavor in every bite. Transfer your tray back to the freezer for about an hour until everything hardens completely.
Step 5: Break and Enjoy
Once firm, simply break your bark into irregular chunks. Serve immediately or store in the fridge for later. Watching those colorful shards come to life on the tray always makes me smile—they’re perfect for snacks, gifts, or dessert plates.
Top Tip
Having made this recipe dozens of times, I’ve discovered a few tricks to making your Chocolate Raspberries Bark Recipe turn out flawlessly every time. These little tips save you time and ensure your bark looks gorgeous and tastes amazing.
- Chocolate Melting Method: Use a double boiler or microwave in 20-second increments, stirring in between, to prevent burning chocolate.
- Spreading Chocolate: Use an offset spatula or the back of a spoon for an even layer that covers all the berries nicely.
- Freeze Time: Don't rush the freezing—at least an hour ensures the bark stays firm and snaps perfectly.
- Berry Placement: Press extra raspberries slightly into the top dark chocolate layer so they stick and don’t fall off when breaking the bark.
How to Serve Chocolate Raspberries Bark Recipe

Garnishes
I like to add a light dusting of powdered sugar or a few extra fresh mint leaves when serving this bark at gatherings. It adds a fresh note and makes the plate look festive without overwhelming the flavors.
Side Dishes
This bark pairs beautifully with a cup of strong coffee or a glass of chilled rosé. For a dessert platter, I often include assorted nuts and soft cheeses to contrast the sweetness and tartness.
Creative Ways to Present
For special occasions, I arrange the pieces on a wooden board lined with parchment, with edible flowers and extra berries scattered around. It’s an easy way to make a simple recipe feel extra special and gift-worthy.
Make Ahead and Storage
Storing Leftovers
I store leftover Chocolate Raspberries Bark in an airtight container in the fridge. It stays fresh and crunchy for up to a week, and the berry flavors stay vibrant without drying out.
Freezing
If you want to keep it longer, freezing works great too. Just wrap the bark tightly in plastic wrap and place it inside a freezer bag. When ready to enjoy, let it thaw in the fridge so it preserves its texture best.
Reheating
Since this is a no-bake recipe, reheating isn’t really necessary. But if your bark softens too much, popping it back into the freezer for a few minutes will restore that satisfying snap perfectly.
Frequently Asked Questions:
Fresh raspberries can be used, but since they contain more moisture, the bark might not hold together as well and could be softer. If you use fresh, try to pat them dry gently before layering.
High-quality white and dark chocolate bars or chips work best. They melt smoothly and give the best texture and flavor. Avoid chocolate with added oils or fillers, which can change the consistency.
When stored in an airtight container in the refrigerator, the bark stays fresh for about one week. Freezing extends its shelf life up to 3 months without flavor loss.
Absolutely! Toasted almonds, pistachios, or pumpkin seeds add fantastic crunch and flavor. Sprinkle them on top along with the raspberries before freezing for the best texture.
Final Thoughts
This Chocolate Raspberries Bark Recipe is one of those recipes I keep coming back to whenever I want an easy yet elegant treat. It’s quick, visually beautiful, and has that perfect balance of tart and sweet that delights everyone I share it with. I can’t recommend it enough as a go-to snack or gift. Give it a try, and I promise you’ll be just as hooked!
Print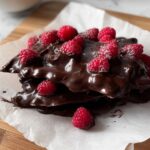
Chocolate Raspberries Bark Recipe
- Prep Time: 15 minutes
- Cook Time: 0 minutes
- Total Time: 1 hour 15 minutes
- Yield: 12 servings
- Category: Dessert
- Method: No-Cook
- Cuisine: International
- Diet: Gluten Free
Description
This delicious Chocolate Bark recipe layers frozen raspberries with smooth white and dark chocolate, creating a beautiful and easy no-bake dessert perfect for any occasion.
Ingredients
Fruits
- 125 g frozen raspberries
- Extra raspberries, for decoration
Chocolate
- 100 g white chocolate, gluten-free
- 120 g dark chocolate, gluten-free
Instructions
- Arrange raspberries. Place the frozen raspberries in a rectangular shape evenly on a parchment-lined tray to create the base layer for your chocolate bark.
- Melt and spread white chocolate. Gently melt the white chocolate until smooth, then spread it evenly over the frozen raspberries. Place the tray in the freezer for 5–10 minutes to allow the white chocolate to firm up slightly.
- Melt and spread dark chocolate. Melt the dark chocolate until smooth and spread it carefully over the layer of raspberries and white chocolate, covering them completely.
- Decorate. Add extra raspberries on top of the dark chocolate layer to enhance both flavor and appearance.
- Freeze to harden. Place the tray in the freezer for 1 hour or until the chocolate bark is fully set and hardened.
- Break and serve. Once hardened, break the chocolate bark into pieces and enjoy this delightful no-bake treat.
Notes
- This recipe requires no baking, making it quick and simple to prepare.
- Use gluten-free white and dark chocolate to keep the recipe gluten-free.
- For easier breaking, ensure chocolate is fully hardened in the freezer before attempting to break into pieces.
- Store leftover chocolate bark in an airtight container in the freezer to maintain freshness.
- Feel free to substitute raspberries with other frozen berries like blueberries or strawberries for variation.
Nutrition
- Serving Size: 1 piece
- Calories: 104 kcal
- Sugar: 10 g
- Sodium: 14 mg
- Fat: 5 g
- Saturated Fat: 3 g
- Unsaturated Fat: 2 g
- Trans Fat: 0 g
- Carbohydrates: 12 g
- Fiber: 1 g
- Protein: 2 g
- Cholesterol: 4 mg


Leave a Reply